beauty

TRIED AND TESTED: I tinted my own eyelashes at home for the first time. It didn't go to plan.


Mamamia’s Tried and Tested series is your weekly review of the latest to hit our desks in beauty, health and wellness. You won’t find any #sponsored content here, just honest, relatable and independent advice. This week, Senior Lifestyle Writer Amy Clark road-tested an at-home eyelash tinting kit.

If there was one thing I could change about my face, it would be my eyelashes.

Sure, I wouldn’t mind if my double chin could jog on too, but swapping my light blonde lashes for a set of perpetually black, glossy ones would be pretty lovely.

Side note – the Mamamia team tried magnetic eyelashes to find out if they’re fab or just a fad. Check it out below, post continues after video.

Video via Mamamia

This is because I hate wearing mascara day-to-day and always forget to book in to get my eyelashes tinted before it’s too late. By too late, I mean before my eyelashes legitimately disappear, taking the shape of my eyes with them.

Depending on where you go, a standard eyelash tint will set you back around $15-30 and takes between 10 and 20 minutes. Times that by once every four to six weeks and it’s a decent financial and time commitment.

ADVERTISEMENT

It got me thinking, maybe I should start tinting my own lashes at home. Here’s how that went.

How to tint eyelashes at home.

Below, you’ll find an honest but informative recap of what my at-home eyelash tinting experience was like, how to do it yourself and the mistakes I made so you can avoid them.

Step 1: Buy the 1000 Hour Eyelash Tint.

1000 Hour Eyelash Tint
Here it is, the famous 1000 Hour Eyelash Tint kit. Image: Supplied/Amy Clark.
ADVERTISEMENT
1000 Hour Eyelash Tint
Inside, you'll find all the makings of glossy, black eyelashes. Image: Supplied/Amy Clark.

People who tint their own eyelashes and brows sing the praises of the 1000 Hour Eyelash & Brow Dye Kit, $18.95.

The Aussie-made at-home eyelash and eyebrows tinting kit promises 12 applications (a 12-month supply) of the smudge-proof, waterproof and easy-to-use formula for results that last for up to six weeks.

1000 Hour Eyelash & Brow Dye Kits come in (lightest to darkest) dark brown, brown-black, black and blue-black and include tint dye, developer liquid, a small mixing stick and a spoolie (a naked mascara wand).

ADVERTISEMENT

Step 2: Prepare your eyelashes and the eyelash tint.

1000 Hour Eyelash Tint
I was not overly inspired by this situation. Image: Supplied/Amy Clark.

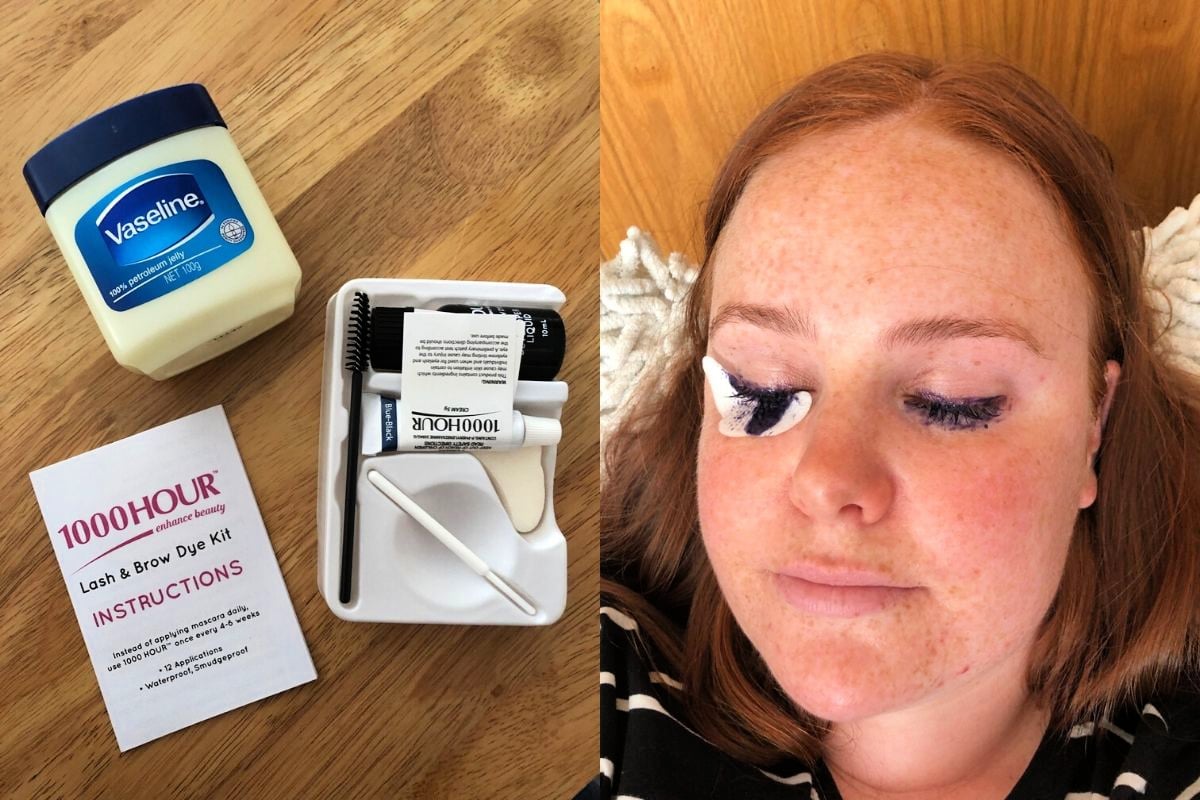
As per the enclosed instructions, I used a makeup cloth to wipe my eyelids to ensure my lashes were free of makeup and any excess oil from my skin. Next, I used a Q-tip to apply Vaseline underneath my eyes and above the lash line on my eyelids to stop the dye from staining my skin.

ADVERTISEMENT

As for the actual tint, the instructions say to mix an inch of the dye from the tube with 10 drops of the developer liquid in the little bowl in the packaging using the white stick thing. I felt like an inch of product would be too much if I wanted to get 12 applications out of it, so I used half that amount.

It took ages for the dye mixture to come together - it looked very gluggy and watery and I was sure this experiment would not end well for me. Eventually, though, it did come together in a semi-chunky paste.

Step 3: Put the tint on your eyelashes and hope for the bloody best.

how to tint eyelashes
Sure, this looks right but these were a pain in the arse. Image: Supplied/Amy Clark.
ADVERTISEMENT
how to tint eyelashes
GAH. This is not OK. Image: Supplied/Amy Clark.
how to tint eyelashes
WTF. WTF. WTF. Image: Supplied/Amy Clark.
ADVERTISEMENT

This is where sh*t went down. Having had my eyelashes tinted in-salon more than 50 times over the last 10 years, I thought I knew what I was doing. I did not.

I decided it would be a good idea to start by placing some thin, white pads under my eyes as an added protection against staining. This was silly because the pads didn't stay in place and were extremely irritating, and I later realised you're meant to use these if you're tinting someone else's lashes. They looked great in selfies, though.

As you can see from the photo, I half abandoned this approach. Using the white stick thing, I applied a thick layer of the tint over my lashes - the instructions said to do this, like you would apply mascara, with the stick or the enclosed spoolie.

ADVERTISEMENT

It was messy. And I feel like whoever might tint their own lashes at-home should be prepared for this to not be a neat, relaxing experience.

Once I smeared the tint all over my lashes, I set the timer for 10 minutes and lay down and closed my eyes. Again, I later found out you don't need to do this, and it is, in fact, messier if you do. I felt a bit of stinging in the beginning but presumably, my eyeballs got used to it and overall, it was mostly painless.

Step 4: Rinse the eyelash tint off and stare at yourself in the mirror.

how to tint eyelashes
Only two cotton wool balls died to make my eyelashes look good. Image: Supplied/Amy Clark.
ADVERTISEMENT

Finally, the bit when you stand over the sink and use drenched cotton wool balls to get this stinging, satanic stuff away from your eyes immediately.

I only used a few cotton wool balls and Q-tips to remove the dye from my skin. The clean up is a little bit messy, but as soon as all the dye was gone, my eyes stopped stinging.

The results of DIY lash tinting.

how to tint eyelashes
BEFORE, no makeup. Image: Supplied/Amy Clark.
ADVERTISEMENT
how to tint eyelashes
BEFORE, up nice and close. Image: Supplied/Amy Clark.
how to tint eyelashes
AFTER, holy moly!! Image: Supplied/Amy Clark.
ADVERTISEMENT
how to tint eyelashes
AFTER, with makeup but no mascara. Image: Supplied/Amy Clark.
ADVERTISEMENT

This is not me being dramatic, but I was seriously so impressed with the results of my at-home eyelash tinting adventure.

As you can see from the before and after photos, my lashes looked dark all the way from the roots, without staining the skin (much).

Next time, I'd probably choose the shade black instead of blue-black as I found the result a touch intense when I wasn't wearing makeup, but overall, I was loving myself sick.

A final thought...

I would 100 per cent tint my own eyelashes at home again now I've done it once and know what to do. It was relatively easy and even though I felt like I had no clue what I was doing, the results were amazing.

I might not though because, well, I'm lazy. We'll see.

Have you tried tinting your own eyelashes before? Tell us your thoughts in the comments below!

Mamamia's Tried and Tested series drops every week. Want us to trial and review a product or treatment you've seen everywhere? Easy, just send an email to submissions@mamamia.com.au. 

You can catch up on more from our Tried and Tested series here:

00:00 / ???