home

'For $500, this DIY makeover made my bathroom more functional, organised, and elevated.'

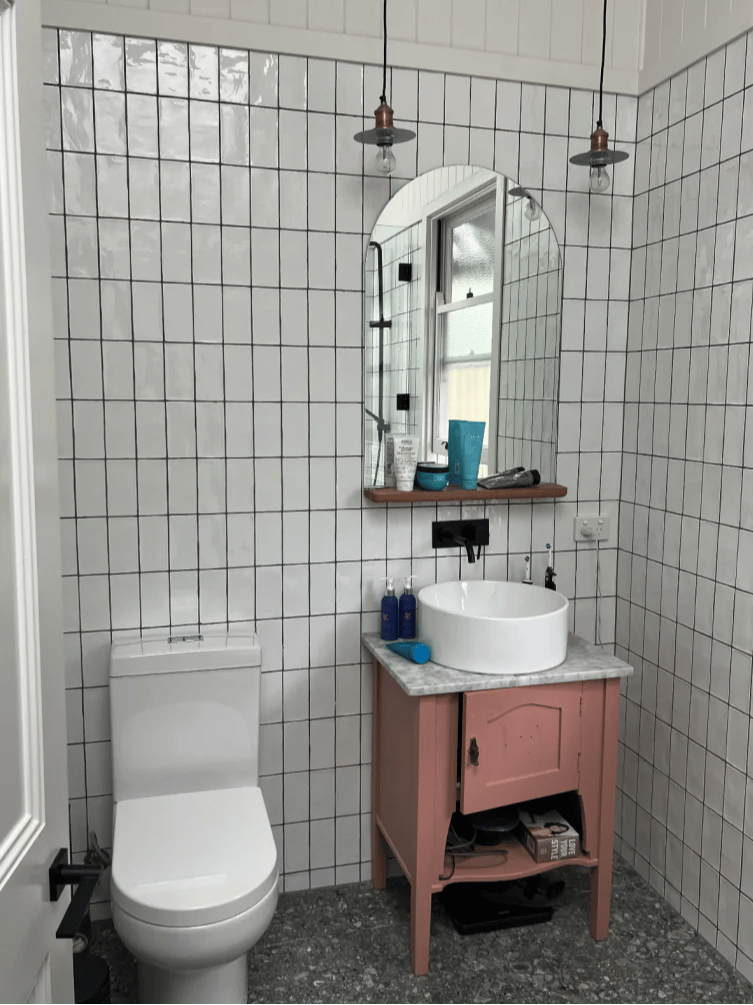
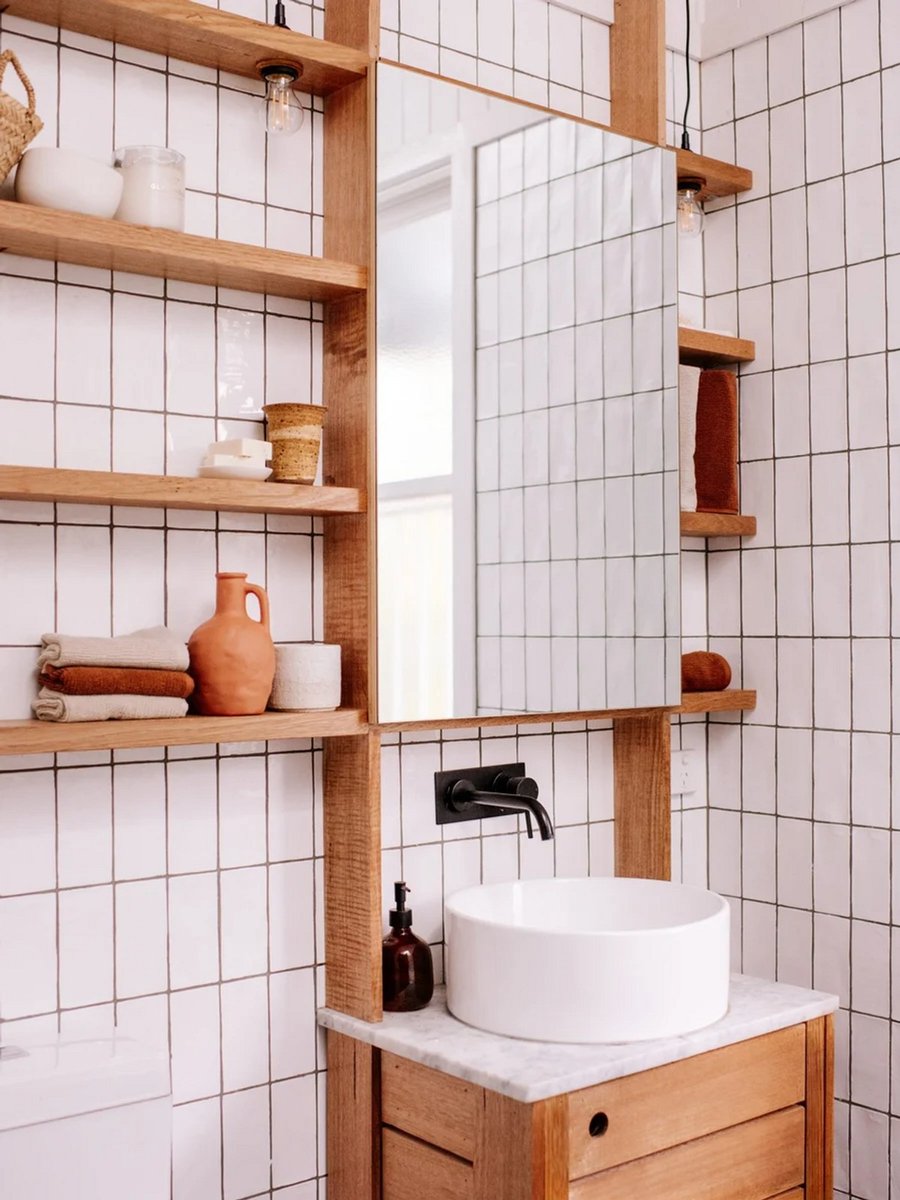
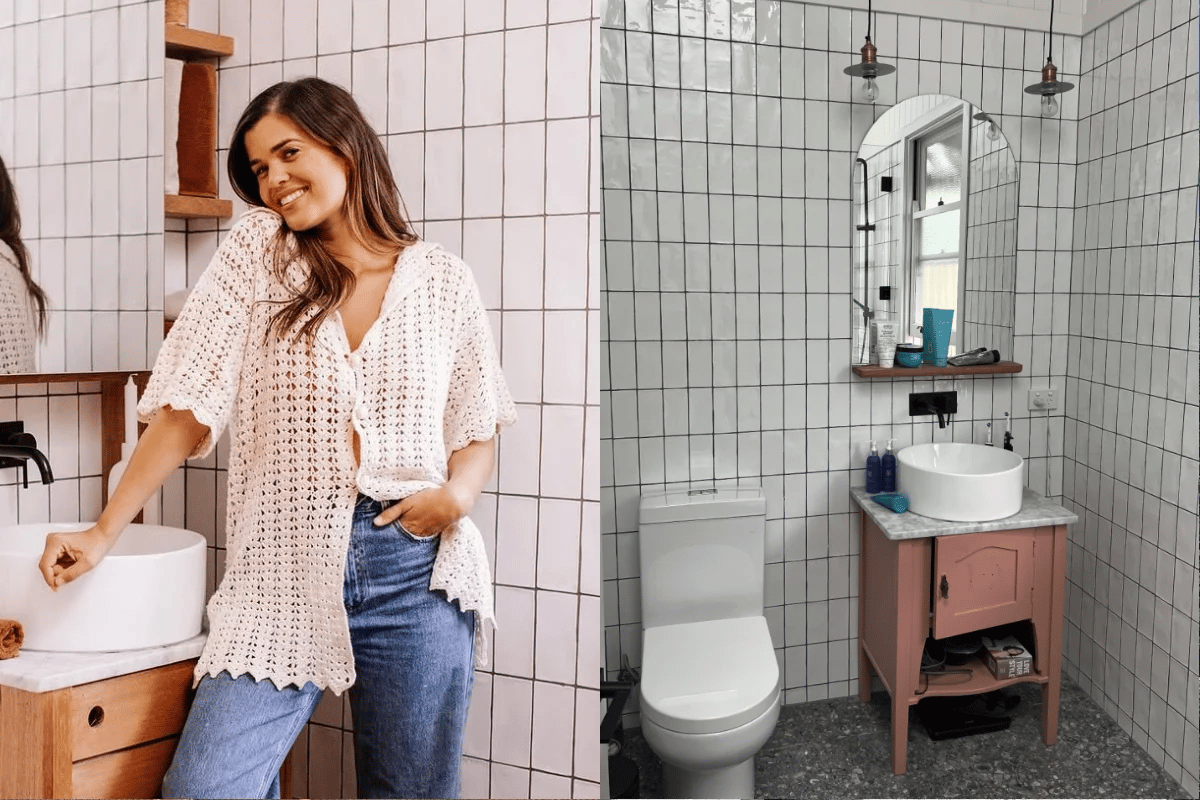
When we first renovated our house five years ago, we made a lot of choices we loved — but, as often happens, some of them didn't turn out to be as functional as we had hoped. One of those was our ensuite bathroom.

We upcycled an antique cabinet into a vanity, which added so much character, but over time, we realised that we desperately needed more storage. So rather than starting from scratch, we decided to give the space a budget-friendly update that didn't compromise on style.

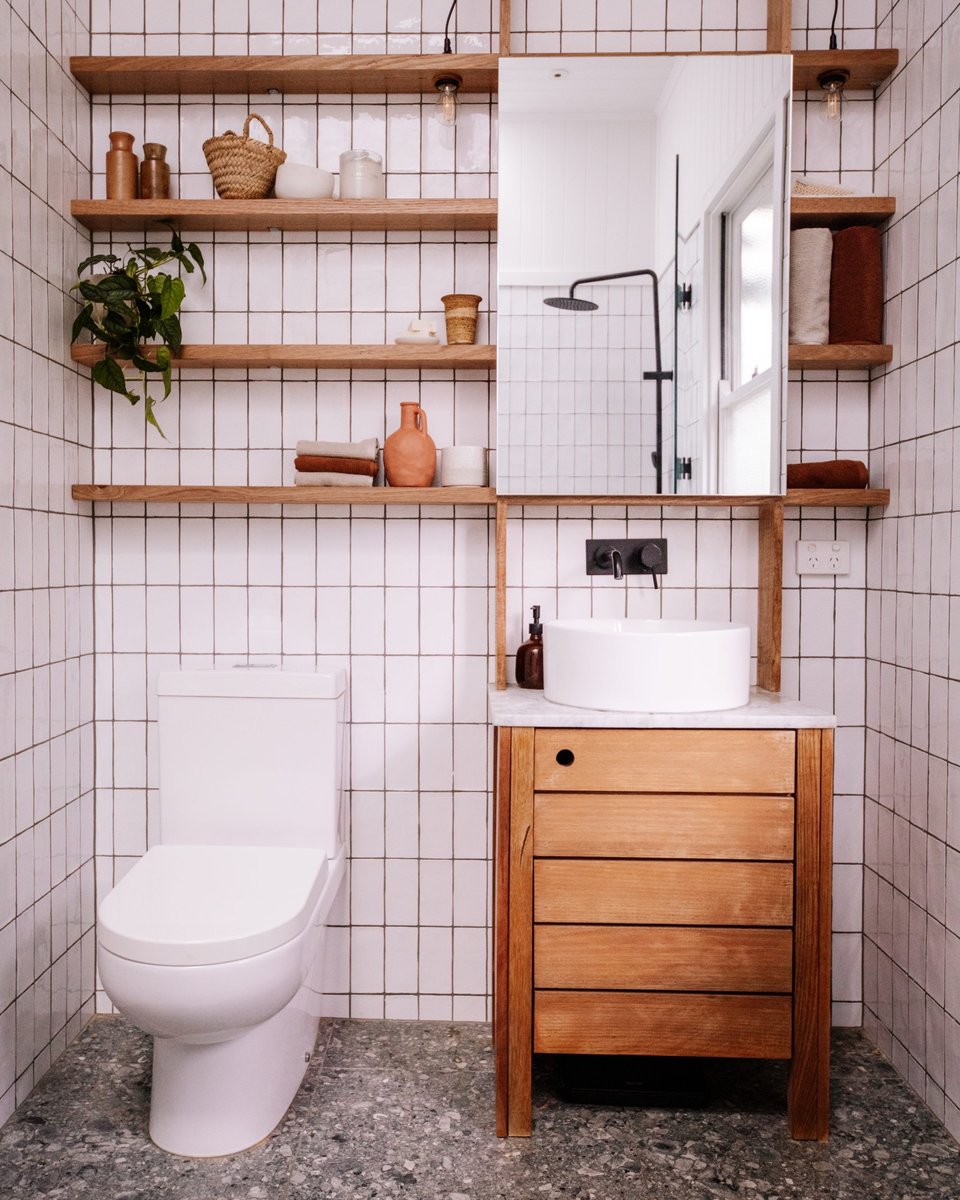
With a little creativity, a few clever ideas, and a lot of DIY, we transformed the bathroom into a more functional, organised, and elevated space—without spending more than $500. Here's how we did it.

Watch: How to clean your house quickly and efficiently. Post continues after video.


TikTok/@cindellkimbrough

Instead of replacing the vanity, we decided to work with what we had. Vanity cabinets can be so expensive, and honestly, it's rare to find an affordable one that's both good quality and cute.

The antique cabinet we used in the initial renovation had great bones, so rather than letting it go, we gave it a refresh.

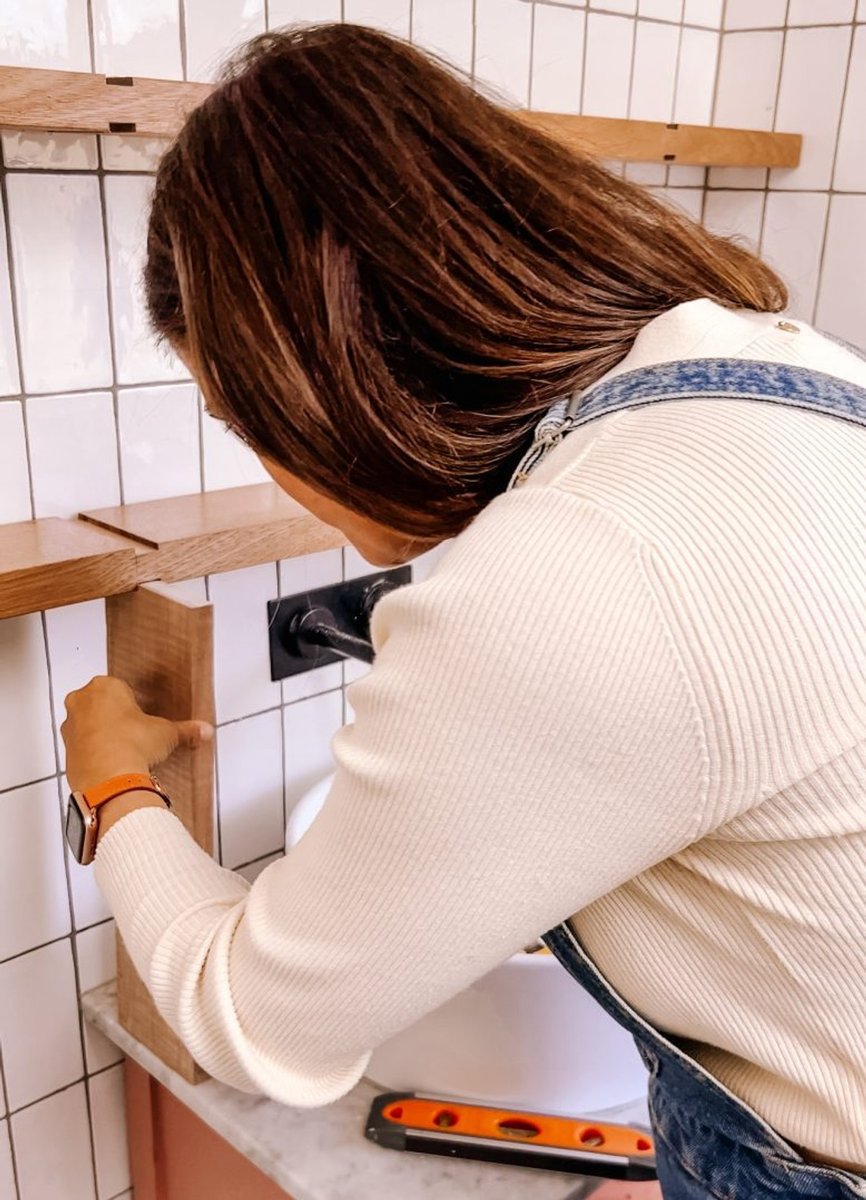
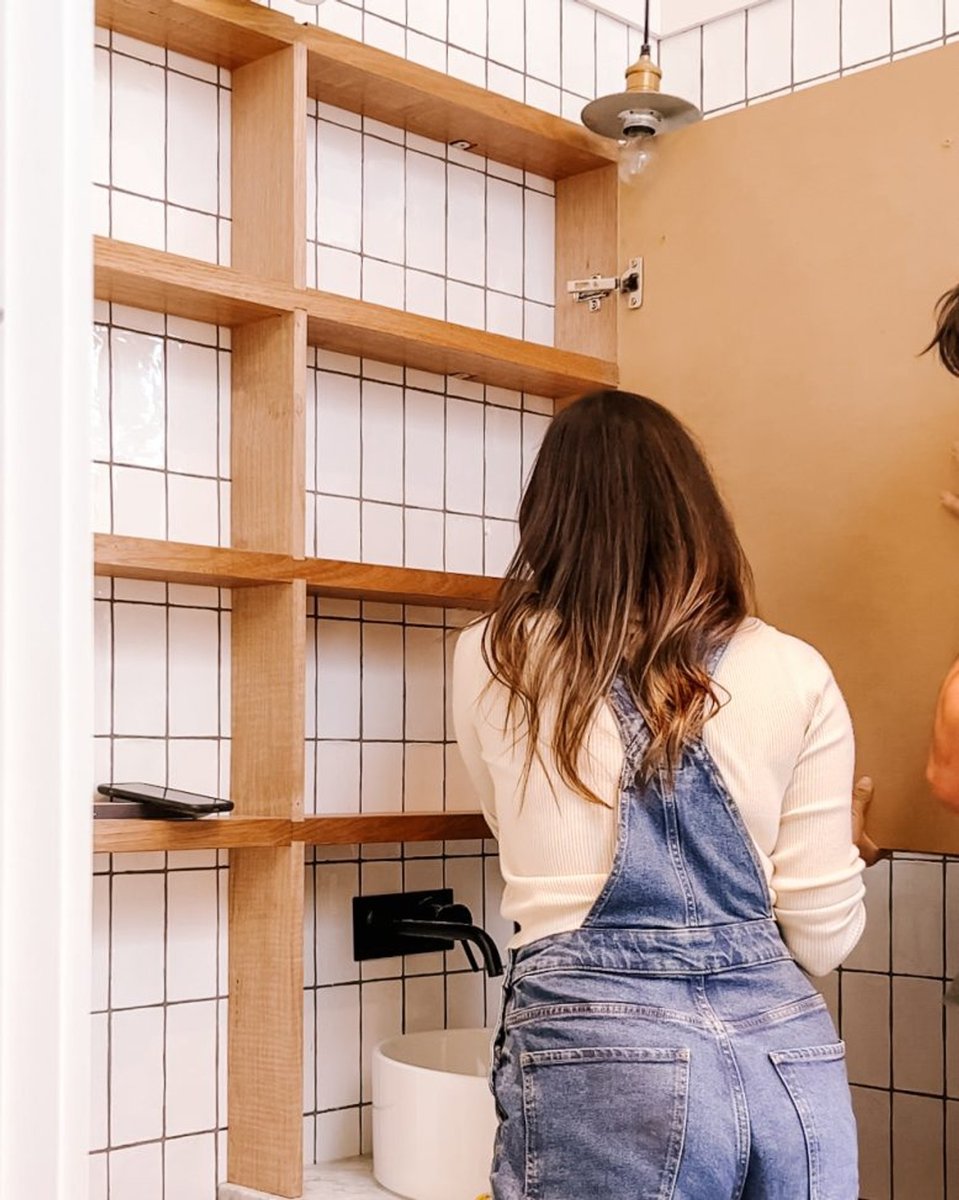
We clad the outside in timber — my favourite Tasmanian oak — to give it a more modern look that still fits within our home's vintage aesthetic. This one single change made the whole space feel more intentional and updated!

ADVERTISEMENT

But the real game-changer? Storage.

The bathroom before. Image: Collective Gen.

It was our biggest issue with the original bathroom, and something we were determined to fix this time around. We kept things simple and cost-effective by adding open shelving across one entire wall.

We used timber cut to size, attached to the wall using angle brackets that we recessed into the underside of each shelf to create a clean, floating look.

ADVERTISEMENT

It's such a small detail, but really helps the whole space feel more high-end.

I attached 12 L brackets into the wall. Image: Collective Gen.

These open shelves gave us a place to store towels, baskets of bathroom essentials, and a few decorative items like candles and plants.

Bathrooms can often feel cold or sterile, and our original renovation was a little bit bland, but adding timber shelving introduced warmth and texture that made a big difference.

But we also knew we needed some closed storage. Bathrooms come with their fair share of mess — think skincare, medications, toothbrushes — that you don't necessarily want on display. So instead of buying a new mirror cabinet (which can be pricey and didn't really match the look we were going for), we decided to make our own.

ADVERTISEMENT

We found a rectangular mirror from Bunnings for under $30, glued it to a piece of MDF for structure, and added soft-close hinges so it could swing open. We mounted it on the timber shelving so it boxed in a small cabinet space, instantly creating a hidden medicine cabinet. I couldn't believe it was that easy!

I glued a mirror on to some MDF and once dried, attached some hinges. Image: Collective Gen.

ADVERTISEMENT

It's such a simple fix, but it's completely changed the functionality of the room. There's now a home for everything, including the things I want to hide, from our toothbrushes to the not-so-pretty necessities, all tucked away behind the mirror.

And because we stained all the timber (shelves, vanity cladding, and cabinet door) in the same warm tone, the room now feels cohesive and elevated.

One of the things I love most about this project is that it didn't require a full renovation to feel like a big change.

We didn't touch the floor, the plumbing, or the tiles, and we kept the existing benchtop and sink. We simply worked with the bones of what we had and used smart, affordable upgrades to make it all work better for us.

The final look of the bathroom. Image: Collective Gen.

ADVERTISEMENT

It also speaks to something I really believe in — that beautiful, functional design doesn't need to be expensive.

There's so much joy and satisfaction in finding a clever solution or making something yourself. Sure, it would've been easier to rip everything out and install a brand-new vanity and mirror cabinet, but I think the end result would have felt less special.

By putting in the time and effort to build something ourselves, we've ended up with a space that's not only better to use, but also feels more personal and meaningful.

It's a reminder that our homes don't have to be perfect from day one — they can grow with us, change with our needs, and evolve over time.

A close-up of the final bathroom. Image: Collective Gen.

ADVERTISEMENT

In the end, the whole bathroom update came in at just under $500. The mirror was around $30, the MDF and hinges were another $40 or so, and the timber and brackets for the shelving and vanity cladding made up the rest.

We already had the tools we needed—like a drill, saw, and sander—which definitely helped keep costs down.What we love most about this mini-renovation is how much impact we achieved without spending a fortune.

By repurposing what we had, getting creative with storage, and embracing DIY solutions, we were able to give our ensuite a whole new lease on life without a complete remodel.

It's proof that you don't have to gut a room or splash out on designer finishes to get a bathroom that works beautifully for your family. Sometimes all it takes is a bit of timber, a weekend of work, and a little imagination. 

Feature image: Supplied/Collective Gen.

Calling all holiday lovers! We want to hear about your holiday experiences! Complete our survey to go in the running to win a $50 gift voucher.

00:00 / ???